Create Multiple Profiles for Your Widget Dashboard
Learn how to create multiple profiles or pages on the customizable widget dashboard, Dashy.

Introduction:
Dashy is filled with customization options, integrated tools and apps, fantastic widgets, all that make your homepage and dashboard efficient. However, with so many options available things can get a little crowded. That’s why profiles are so important and useful. You are able to create a secondary, or even a third Dashy dashboard for the different aspects of your life.
Why have multiple profiles or pages?
An example of how multiple profiles can be effective: You can have a Dashy dashboard for your work, complete with your calendar, time tracker, to-do list, bookmarks, ambience, reminders, or whatever you need. Then you can have a secondary profile for your leisure time that has news, podcasts, music, and other things that make your chill time on the internet a bit less chaotic.
Creating these different profiles provides you with even more customization options for your dashboards, and they can help you be more organized. Let’s take a look at how to create a new profile and page and how you can switch between them easily.

How to create a new profile:
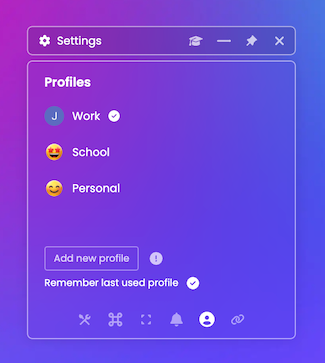
There are three different ways you can create a new profile: the dock, the My Dashy widget, and the Settings widget. From the dock at the bottom of the screen, click on the My Dashy icon and click “Manage Profiles.” This will open up the Settings widget and have it open to the profiles tab.
From here you can select “Add new profile,” choose or import an avatar, name the new profile, enable a PIN if you desire, and press “Create.” This will now take you to your brand new profile which you can customize into a perfect widget dashboard for your homepage needs.
Simplified instructions for creating a new profile:
- Open the Settings widget.
- Navigate to the Profiles tab (second from the right).
- Click "Add new profile."
- Choose an avatar or photo.
- Name your new profile.
- Add a PIN for security if you want to.
- Press "Create."
Switching between profiles:
Now that you have created a new profile, let’s learn how to swap between profiles. Again, you will have the same three options to access profiles. The dock, My Dashy, and Settings. If you click on My Dashy in the dock you will see a dropdown menu where “Manage Profiles” used to be. Click here and you can select which profile you would like to display.
From the Settings widget you can fully manage your different profiles by navigating to the Profiles tab (second from the right). Click on a profile to display it, click the edit icon to adjust profile information, or delete a profile. Each Dashy account can have up to three profiles.
Simplified instructions to switch between profiles:
- Click on My Dashy in the dock at the bottom of your dashboard.
- Use the dropdown menu of profile names.
- Select the profile you want to display
OR
- Open the Settings Widget.
- Navigate to the Profiles tab (second from the right).
- Click on the profile you want to display.
- From here you can edit/delete profiles.
- Check "Remember last used profile" to pick up where you left off next time.
- Uncheck "Remember last used profile" to always start with your main profile.
Conclusion:
Now that you know how to create and switch between your Dashy profiles, it is our sincere hope that your time online is more enjoyable, and more efficient.
Join the Dashy community at DashyApp.com and follow us on LinkedIn, Twitter, YouTube, and Instagram.


